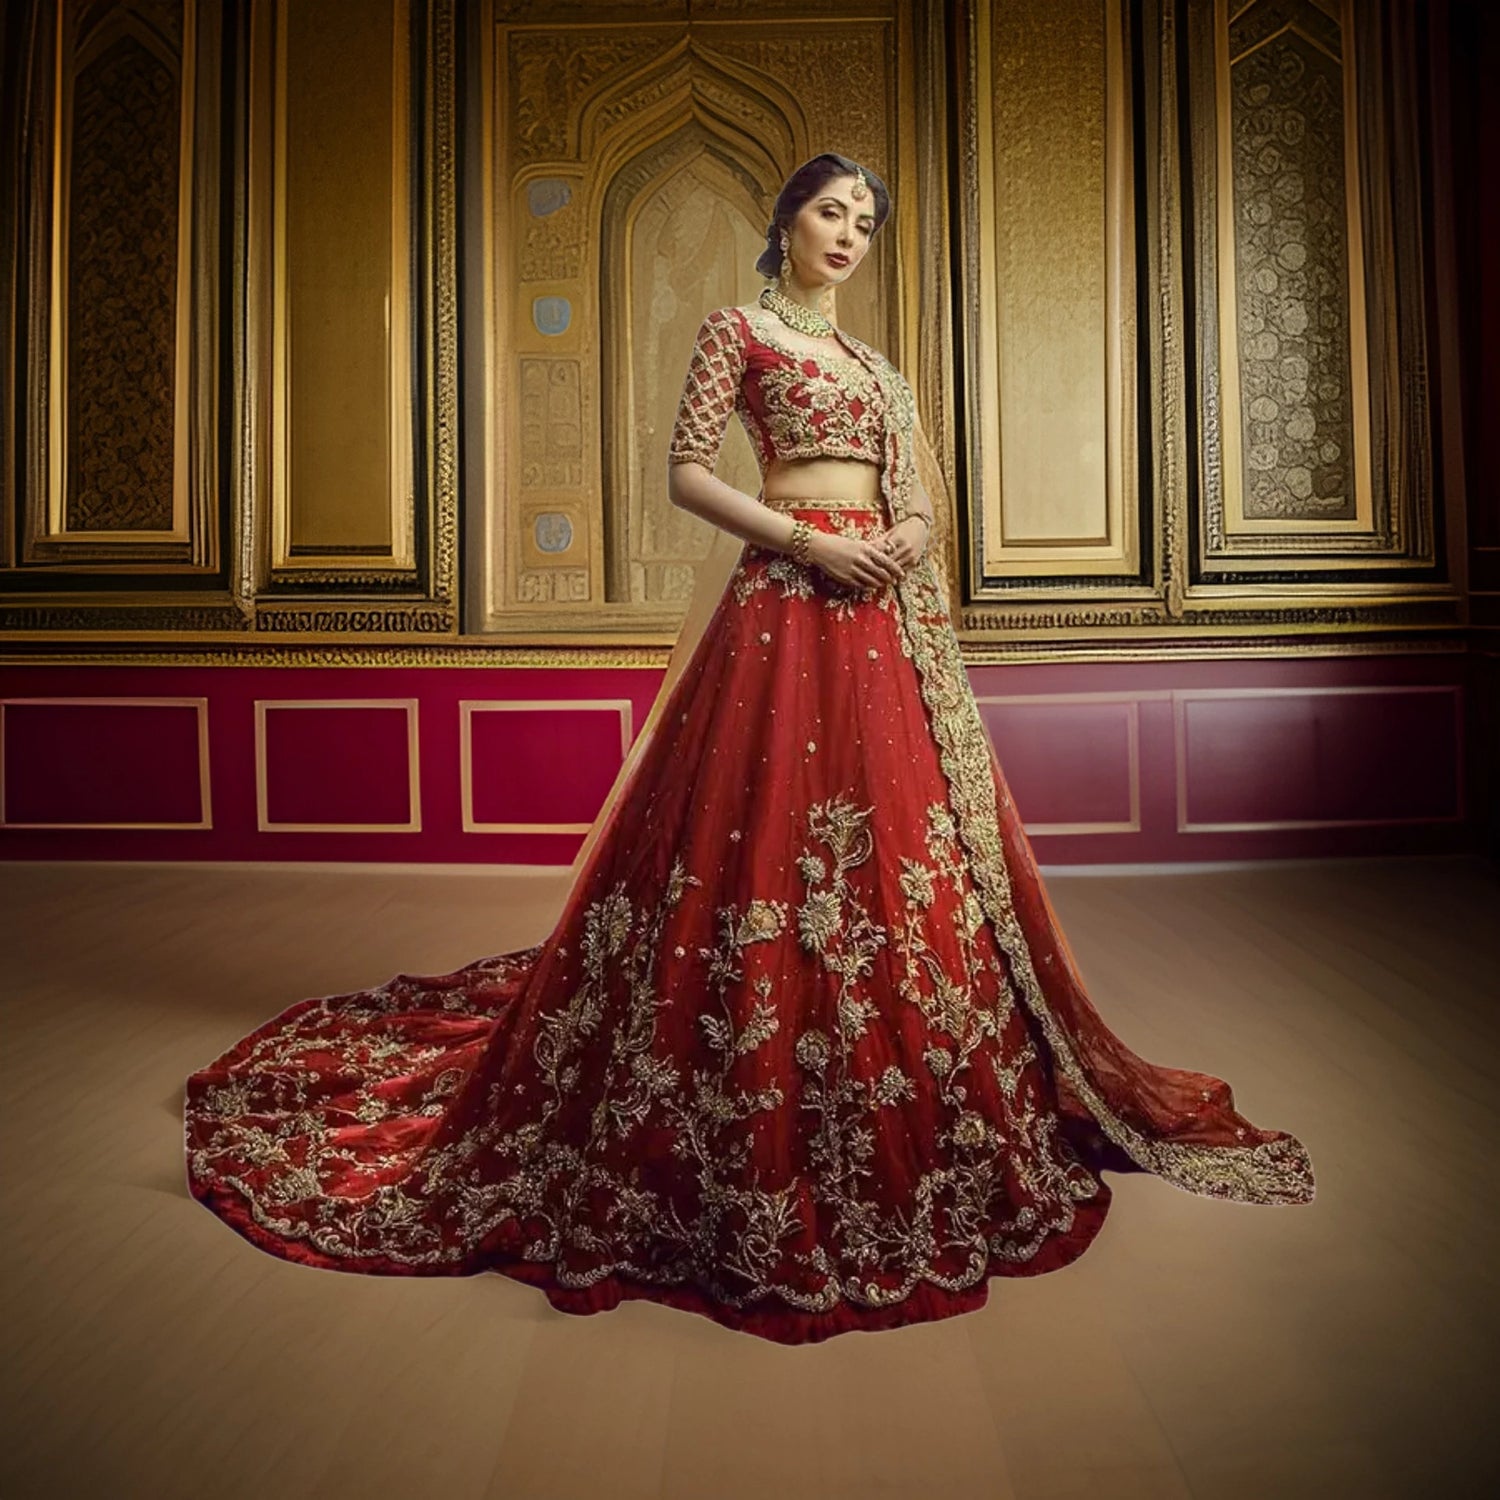
She steps into the room and every eye catches the soft cascade of fabric framing her face—two dupattas layered with intention, movement, and timeless grace. Double dupatta draping transforms bridal style into a storytelling moment: tradition meets couture, comfort meets drama, and every pleat becomes a promise. This guide walks you through step-by-step techniques, pro tips, and styling secrets to create a flawless double dupatta bridal look that photographs beautifully, stays secure through dances and rituals, and feels utterly you.
Why Choose Double Dupatta Draping for Brides?
Double dupatta draping amplifies the bridal aura. It adds volume, depth, and visual interest while allowing brides to play with textures and transparency. Whether you want a soft veil for the ceremony and a decorative shoulder drape for portraits, or a regal cape paired with a sheer face veil—two dupattas give you options without compromising tradition.
- Regal silhouette: Layers create a throne-worthy presence for the bride.
- Versatility: Mix heaviness and lightness—net veil with embroidered silk drape.
- Photography-ready: Layers catch light and create depth in images.
- Functional coverage: One dupatta can act as a veil while the other anchors the look.
- Personal expression: Combine heirloom dupattas with contemporary pieces for story-driven styling.
Choosing Dupattas: Fabrics, Colors, and Proportions
Fabric choices that work best
Pick dupatta fabrics with contrasting weights to balance aesthetics and wearability. Popular combinations include:
- Sheer net or organza + heavy silk or velvet (for dramatic fall and ornate borders)
- Chiffon + brocade (flowy veil with rich texture)
- Georgette + raw silk (light movement with structured drape)
Color coordination and embellishment tips
Layer a subtle, lighter-toned veil over a richly colored, heavily embroidered drape for depth. Use complementary embroidery motifs—zardozi on one and sequins on the other—to create harmony without visual clash. For modern brides, tonal layering (different shades of the same color) offers sophistication and coherence.
Length and proportion guide
For lehengas, consider one dupatta at 2.5–3 meters for full coverage and ceremonial use, and a second shorter dupatta of 2–2.2 meters for shoulder styling or cape effects. If using a saree-style blouse, balance the dupattas so they don’t overpower the silhouette—one anchored at the head and the other cascading at the back or side works well.
Essential Tools and Wedding-Day Prep
Pack a bridal dupatta kit and rehearse the drape before the big day. Small tools equal big confidence.
- Quality safety pins in multiple sizes
- Magnetic dupatta clips and small hair clips
- Non-slip double-sided fashion tape
- Mini sewing kit and extra thread
- Emergency chiffon or net patch piece
Quick bridal checklist
- Two dupattas pressed and steamed
- Extra pins and clutch-safe magnetic clips
- Padded hanger or garment bag for transit
- Run-through with your stylist and photographer
Step-by-Step Double Dupatta Draping Techniques
Below are detailed, easy-to-follow methods that suit different ceremonies—from mandap rituals to reception entrances. Each technique explains how to secure both dupattas and gives styling variations for lehengas and anarkalis.
Classic Veil + Shoulder Drape (Ceremony-Ready)
- Wear your blouse and lehenga and secure any heavy jewelry before draping.
- Take the first dupatta (sheer/net) and center it over your head as a veil. Let equal lengths fall on both sides.
- Secure the veil to your hair near the crown with a small clip or bobby pins; use a safety pin at the hairline to a secure bun if needed.
- Take the second dupatta (heavier embroidered piece), pleat it neatly into 4–6 accordion pleats depending on width.
- Drape the pleated dupatta over one shoulder, bring it across the back, and pin it near the opposite waist to form a diagonal fall. For added security, attach it to the waistband or tie a discreet knot under the lehenga's belt.
- Adjust the veil to face-forward for the pheras and sweep it back after the ceremony for portrait shots.
Quick tip: Hide safety pin ends under the embroidery or secure them to a stitched loop inside the dupatta to prevent snagging.
Regal Cape Style with Draped Veil (Statement Reception Look)
- Place a heavier dupatta across your shoulders like a cape. Center it at the back and let the borders fall symmetrically.
- Use discreet inner stitches near the shoulder seams to create sewn-in anchors (ask your tailor to pre-install loops).
- Take a lighter dupatta and drape it as a low veil from the crown, tucking one end under the cape near your shoulder and letting the other end cascade freely.
- Secure both pieces with magnetic clips close to the shoulder and at the nape to prevent slipping during movement.
Styling note: Add a kamarbandh or waist belt to cinch the silhouette and keep the cape neatly in place.
Layered Front Fall with Back Veil (Photographer’s Favorite)
- Place the heavy dupatta over one shoulder and let it fall across the front to create a layered front panel.
- Pin the inner edge near the blouse’s shoulder seam and secure the front pleats at the waist.
- Use the second, lighter dupatta as a back veil: center it at the crown and let it fall over the back, covering the cape’s junction.
- For dramatic portraits, pull the back veil slightly away from the shoulders to create a soft halo of fabric around your head.
Contemporary Belted Double Dupatta (Trend-forward & Practical)
- Pleat both dupattas into neat panels.
- Layer them—heavier at the back, lighter at the front—and bring them forward around the waist.
- Secure both to the blouse shoulder with pins and then use a decorative belt to anchor the dupattas at the waist, creating a modern, sculpted look.
- This method keeps both hands free for rituals and dancing.
Hair, Makeup, and Jewelry — Complete the Double Dupatta Look
Hairstyle pairings
- Low bun with floral gajra: ideal for heavy veils and traditional aesthetics.
- Soft side-swept waves: complements a shoulder drape and lighter veils.
- Structured braid or fishtail: works well with cape styles and adds a modern twist.
Makeup considerations
Keep makeup long-wear and camera-ready. Heavy dupattas can create shadowing, so highlight the cheeks and inner eye corners to keep the face illuminated. Waterproof finishes for eye makeup protect against tears and heat.
Movement, Photography, and Comfort Tips
- Practice walking and sitting with your chosen drape—test stairs and ritual seating positions.
- For dance sequences, temporarily remove the lighter veil or switch to a secured belted drape.
- Ask your photographer to plan a few “veil-catching” shots during portraits—soft wind or a gentle lift yields cinematic images.
- Balance the weight: place heavier dupatta on the side that’s less active to avoid shoulder strain.
Quick Fixes and Troubleshooting
Even the best-laid plans need on-the-spot solutions. Here are quick answers to common bridal dupatta issues.
- Dupatta slipping: use fashion tape along the neckline and add a hidden safety pin under a border stitch.
- Visible pins: tuck pin heads inside embroidery motifs or use color-matched thread to stitch a small loop for clipping.
- Bulky shoulder appearance: switch to a lighter second dupatta or remove excess pleats before securing.
- Tangled dupattas: breathe, unpin calmly, and re-pleat using hair clips to hold sections while you adjust.
Real Bride Moment: The Confidence of a Perfect Drape
Think of Saanvi—she wanted a look that honored her grandmother’s embroidered dupatta while showcasing a modern silhouette. We layered a delicate net veil inherited from the family over a handcrafted silk dupatta with a bold border, anchored by a slim gold belt. During the vows, the veil framed her face perfectly; during the reception, the silk panel created movement as she danced. The double dupatta told a personal story: legacy and contemporary joy in one breathtaking ensemble.
Practice Schedule: How to Prepare Before the Wedding
- Two weeks before: Finalize dupatta combinations and test drapes with trial lehenga fittings.
- One week before: Have your tailor add sewn loops or reinforcement points as needed.
- Two days before: Run a full dress rehearsal—walk, sit, and pose in lighting similar to your event.
- Wedding day morning: Re-steam dupattas, pack emergency kit, and assign a bridesmaid or stylist as your dupatta support.
Styling Add-Ons to Elevate Your Double Dupatta Look
- Maang tikka or passa to anchor the veil at the crown
- Statement belt (kamarbandh) for structured silhouettes
- Pins with fabric covers or decorative motifs to blend function with fashion
- Layered necklaces that peek through open veils for dramatic portraits
FAQ: Bridal Double Dupatta Questions Answered
What is the best way to secure two dupattas so they don't slip during the ceremony?
Use a combination of methods: sew discreet loops into the blouse or shoulder seam, secure with hidden safety pins under embroidery, and reinforce with fashion tape at high-movement points. Magnetic clips and a light belt can add extra hold for reception dances.
Can I use two heavy embellished dupattas together?
Yes, but balance is key. Pair one heavy piece with another slightly lighter dupatta, and distribute weight across both shoulders. Consider structural support like inner loops or a small waist belt to minimize strain and keep the silhouette elegant.
How do I drape a double dupatta for a lehenga versus an anarkali?
For lehengas, favor asymmetrical drapes: veil at the head and a diagonal shoulder-to-waist fall for the second dupatta. For anarkalis, cape-style layering or symmetrical shoulder drapes maintain flow and complement the gown-like silhouette.
Is it better to pin the dupatta to hair or blouse?
Pinning to both offers the best security: anchor the veil to the hair at the crown and pin the second dupatta to the blouse’s shoulder seam or waistband. This distributes tension and reduces the chance of slippage.
How can I make the dupatta look good in photos?
Coordinate with your photographer for movement shots—gentle lifts, walking shots, and backlit portraits enhance sheer fabrics. Use layered textures so light plays across the surfaces, and keep key edges and motifs visible by avoiding over-pleating.
What should I carry in an emergency dupatta kit?
Safety pins, color-matched thread and needle, mini stapler for fabric (if needed), small scissors, fashion tape, extra hairpins, and a spare brooch or clip. A folded spare net or chiffon patch can fix tears temporarily.
Final Thoughts
Double dupatta draping is an opportunity to craft a bridal look that feels regal, personal, and effortless. With thoughtful fabric pairings, secure anchoring, and a bit of rehearsal, you can create a layered style that honors tradition while reflecting your style story. Each pleat becomes a detail in the narrative of your day—choose them with care and let the fabrics speak for you.
Ready to create your dream bridal moment? Explore Shreekama’s exclusive lehenga range to find the perfect dupattas and ensembles that make double dupatta draping effortless and unforgettable. Visit our collection now: https://www.shreekama.com/collections/lehengas